
Ch. 1 : I See You
College. A temple of knowledge. A place to learn and grow.
Well, not quite. At least not in my experience. Though there isn't much I've gained directly from attending classes (save for the cursory introduction to a few subjects), I do admit I have had tonnes of opportunities to learn. And being the ever-curious soul I am, I didn't miss out out on any.
One such subject that has captured my imagination quite recently is Computer Vision, the magical technology that can make a computer 'see'.
It started about 2 weeks ago, when my friends and I were brainstorming on what to present as a Minor project. We were running late already (thanks to our first Minor project idea1 ). So, while we were randomly pitching ideas to each other, I suggested making an android application that can print the details of the objects in focus on the screen, in real time. And at this point, we all hopped on to the computer vision train, waving at the stations (aka project ideas) as we passed them. This we did till we reached a project idea that was (seemingly) small, practical and achievable within the given time frame. The idea was simple. A basic software that will translate your hand gestures into commands for your computer. There was a discussion on what specific type of commands it would support (from general control like navigation through the file system, controlling brightness, volume etc to simply controlling a music application). It was later decided that we will support a rather wild-card entry, Google Chrome browser. To anyone who follows this blog, Google Chrome would be a surprise. Yes, I know me+Chrome is not a frequent sight, but as they say, anything for science.
So, that's enough backstory. Now on to the good stuff. Being noobs in the field of image processing, we decided to stay with python, for it was more comfortable to most of the team (excluding me, I prefer C/C++. Always.) Anyway, the development started and we did our researches and found out techniques and discusses algorithms.
Fast forward - Coding. The real good stuff. There are a bunch of OpenCV tutorials available on the internet, like this one and this one. And of course, RTFM, ie., the OpenCV documentation. This gave me a good head start for the task at hand.
I won't be going into details of the installation process (mainly because it is too boring and I need to catch up on sleep). So, hope you'll figure it out. (Psst.. unlike me, Google doesn't sleep)
Say 'Cheese'!
First things first. Since our aim is to process gestures in real time, we obviously something to give us some sort of a real-time video input. A modern day contraption that can somehow capture the essence of vision and translate it into a digital stream of bytes. Something so..... screw it, enough Dora-the-explorer. We need a camera. A webcam is the first choice, for it is usually already there on your laptop. It gets tricky when you don't have a laptop, or a dedicated webcam, as happened with one of our teammates. Using a webcam with OpenCV is simple, as the following snippet shows:
import cv2
import numpy as np

## Create a capture device instance
## For more:  http://docs.opencv.org/modules/highgui/doc/reading_and_writing_images_and_video.html#videocapture-videocapture
cap = cv2.VideoCapture(0)

## While the capture device is open
while cap.isOpened():
    ## Grab a frame (current image in the memory)
    ret, frame = cap.read()
    ## Process as desired

## Release camera object when done
cap.release()
But not all is lost. It's possible to use an android device with a camera for the purpose too. Here you can find a marvelous little application, IP Webcam, that allows you to locally stream from your mobile camera. You can simply view the stream on the browser/VLC of another device by keying in the IP and the port of the server you run (using the app).
The tricky part is when you need to use it as a video feed and process it in OpenCV. Fret not, I have made this process super easy for you (well, primarily the teammate we just spoke of, but yeah, you too). Just download this repo and you're good to go. There is a file called AndroidCamFeed.py, which is actually a module I wrote specifically to work with this application. The usage is simple and demonstrated in the Example.py. Just import the module and use like you would use the cv2.VideoCapture class, the interface is pretty much the same (which, by the way, is no coincidence). Here's a snippet for example:
## Import AndroidCamFeed module
from AndroidCamFeed import AndroidCamFeed

## set host = address of server, in <IP>:<port> format
## Replace the string with your own server's IP and port
host = '192.168.1.2:8080'

## Create new ACF instance with host as parameter
acf = AndroidCamFeed(host)

## While acf is open
while acf.isOpened():

        ## Read frame
        frame = acf.read()
        if frame is not None:
            ## Process frame

## Must release ACF object before exiting.
acf.release()
A sleight of hand
The next step we take towards the goal is detecting the hand. This can be tricky and there a many algorithms that try to achieve this. In my personal experience, transforming the image into Y-Cr-Cb color space is effective, especially when coupled with Gaussian Blur and thresholding using Otsu algorithm. Don't be overwhelmed, we'll take them all down piece by piece. Starting with color spaces.
The default input from your capture device is in RGB color space. This is the color space we see the world in, with our eyes. Though there are methods to detect skin (and thereby hand) from this color space, they may not be as effective as the others. So we change the color space of the image to the Y-Cr-Cb color space. The transformation can be done with literally one line of code:
imgYCC = cv2.cvtColor(image, cv2.COLOR_BGR2YCR_CB)
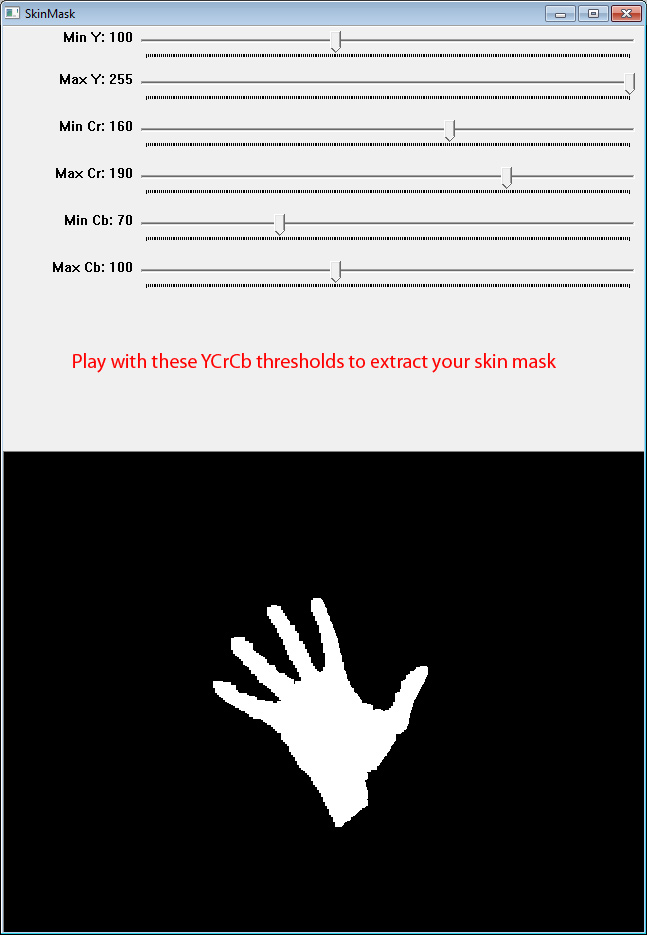
Now that we have the image in the required format, we need to find a way to identify what range of the Y-Cr-Cb values gives us the clearest view of the skin. Once we have skin, we can figure out the hand. There are again many options for finding the sweet spot. I'd recommend you do some reading/innovating of your own and find a range that best suits you. For help, you may consider reading through research papers such as this, this and this. There are plenty more so you can dig as deep as you want.
I experimented both manually (by setting up trackbars and manually setting values to optimal range) and by using the elliptical boundary model for skin color detection. While manual settings offer a better and finer control, it's a pain to adjust the values.
So, by now you probably have effectively separated the hand component from the rest of the image. Your resulting image may look something like this:
A little rough around the edges eh? To soften the rough edges, we can use this simple morphology snippet:
## Used for erosion and dilation
kernel = np.ones((size1, size2), np.uint8)

## Erode then dilate to smoothen out the edges. Check their documentation for more details
frame2 = cv2.erode(frame, kernel, iterations = 1)
frame2 = cv2.dilate(frame, kernel, iterations = 1)

## Use opening and closing morphological transformations to remove those annoying little dots
frame2 = cv2.morphologyEx(frame, cv2.MORPH_OPEN, kernel)
frame2 = cv2.morphologyEx(frame, cv2.MORPH_CLOSE, kernel)
To smoothen it out more, we use Gaussian Blur and then threshold using the Otsu algorithm as shown:
## Here, (x, y) is a tuple denoting the Gaussian kernel size, with Gaussian kernel standard deviation ## in X direction being 0, (for Y direction, it is 0 by default)
imgYCC = cv2.GaussianBlur(imgYCC, (x, y), 0)

## Set 0 and 255 to the desired minimum and maximum thresholds. (Psst.. experiment time)
ret, imgYCC = cv2.threshold(imgYCC, 0, 255, cv2.THRESH_OTSU)
yawnnn... OK, so now we have a nice and smooth image to work on. Looking back at it all, it doesn't look like we have a long way, but believe me, getting here the way we did is big task. Extracting the hand out of an RGB (or BGR, as it used in OpenCV) image is half the job (well, a little less than half, but you get the point). In the next post, we'll discuss a little more about hand exatraction, specifically blob analysis. Then we'll continue on to detecting the hand, and experiment with algorithms to accurately detect parts of the hand.
And this is the point where I am looking at you, no expression, a blank poker face, hoping you'll get the signal, say thanks and bid farewell.. No, I don't mean you to go, it's just.. I'm tired and there's a lot more I'd like to talk about in more detail, but some other time. (Very soon, I promise). So, there you go. Go on and experiment, research, play/mess with the code we wrote today. And if you like, you can even check out our project Dex, as we call it. Help will be much appreciated ;)
As a great wizard once said,
Fly, you fools!
Happy coding :)
1 The first Minor project idea was that of an automated bot that would crack Google's new NoCaptcha reCaptcha system by imitating organic mouse movements and selecting the correct images for the given keyword. Sadly, it was dropped because of time constraints.


0 comments
Post a Comment